|
|
||||||||
BEACHES TO BREAKOUT BATTLES IN NORMANDY FOR THE PERSONAL COMPUTER
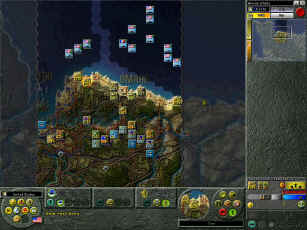
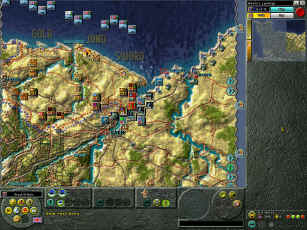
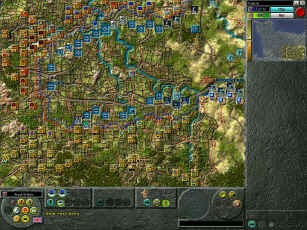
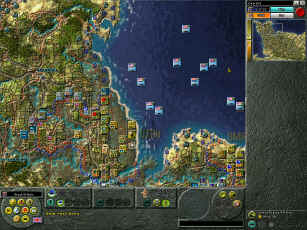
Australia's SSG deserves some serious respect. One of the pioneering publishers of historical computer wargames in the eighties, it survives today, outliving most of its fellow giants, most significantly SSI and Microprose. The company adapted and, though it no longer puts out products itself, it morphed into a very good design studio for others. Its Decisive Battles of World War II series has a home with Matrix Games, beginning with 2003's Korsun Pocket, which also included an updated version of the first game in the series, The Ardennes Offensive, first published by SSI. The most recent game in the series is Battles in Italy, released in May 2005. This was a scant eight months after Matrix released Battles in Normandy, the game that returned the system to Northwest Europe. That one should not be lost in the glare of its younger sibling, as it is a challenging, sometimes close to exasperating, game fit to address the greatest invasion in history. GAME ESSENTIALSThe look and feel of Battles in Normandy should be appealing and familiar to older computer wargamers, and those whose formative years were spent with their board-based cousins, only this game looks better. It has the venerable two-dimensional top-down viewpoint. If the player opts to show the hex borders, the boardgame look is complete. Except for the big Overlord campaign game, the scenarios take place on a portion of the map, from Cherbourg to the killing fields of the Falaise pocket. That takes demands a fairly detailed treatment of terrain; the battles in Normandy took place on the beaches, the fields south of Caen, and of course the bocage hedgerow country. Battles in Normandy does the terrain justice. The sequence of play is one of the simplest imaginable, in that there are two player turns, and in them the active side can perform his operations in any order that he chooses. A simple fact, it fosters a lot of the complexity in operations, particularly those of the offensive variety. For example, the player can advance his units to the line, make their attacks, and then send his exploitation units through the gap if it all works. Even this might not sound overly complex or novel, but it can get complicated when the player has to find a specific order in which to make his attacks. Also, combat can take place any time during movement, so that adds another variable and might not even involve combat. The combat results tables tend to be attritional when units engage frontally. Most really decisive results occur when the defenders are assaulted from the flanks or rear, or several angles at once; better yet, when the enemy hex is completely surrounded by friendly units or their zones of control. Artillery is vital, and the fortunately for the Allies they have plenty of it. A unit lends strength and beneficial combat shifts when allocated to the attack, and on the defense units benefit from a shift for the best one or two friendly units within range, without player intervention. It is an absolutely vital resource for offensive operations, turning impossible attacks into things worth undertaking, and good ones into less costly ones, vital considerations for the Allies. Though it was overwhelming for the Allies, air support is strangely missing. It exists as something in the background, supporting combats without the player having to allocate it. Interdiction, on the other hand, is targeted by the player, and impedes movement and supply along roads surrounding the designated hex. Zones of control are a lot more effective in affecting combat than movement. Mechanized troops can pour through the gaps between enemy infantry, and one can be sure that they will if the human player gives an opportunity to the unusually opportunistic artificial intelligence. As with its predecessors, the order of battle is very detailed, and divisional affiliation is indicated by the historical insignia or shoulder patches reproduced on their icons. It is an extremely effective of method, and along the way lends Battles in Normandy a little extra historical feel. The game includes anti-aircraft units for both sides, not just the Germans, which can neutralize attempts at aerial interdiction. Of course, German heavy flak units, the famous (or infamous from the perspective of their targets) 88's are deadly against ground targets. Mechanized cavalry and reconnaissance units appear, as they do in many operational games of World War II. Usually though they are distinguishable from other armored units only by a little higher mobility and often lower combat strengths, and players are used to that. Battles in Normandy does something not quite as customary, by giving them them the actual ability to conduct reconnaissance. As do most computer wargames, Battles in Normandy has limited intelligence, with enemy units hidden unless and until the player approaches contact. There is nothing new there. What is new is letting reccon units see further. They do not have to end movement to take advantage of this capability either; simply moving past an enemy unit is enough to reveal its presence and identity. Any unit can do this, but the cavalry can do it from further away. It is a capability that players on either side can and should employ before ordering their other troops to advance into the unknown. INVASION MECHANICSWhat is a game on history's greatest invasion if it does not simulate the battles on the beaches? Battles in Normandy does cover the actions on Omaha, Utah, Sword, Juno and Gold, and in an especially interesting manner. The player has about the same level of discretion in choosing landing beaches as he does in most D-Day games at this level, which is next to none. The beaches are all named and delineated on the map, so that the player cannot come ashore anyplace else. He can choose which units attack which hexes, and that is about it. He has even less say in airborne operations, as the two American and one British divisions begin on the map, with drift and casualties already calculated. The game simulates naval gunfire with a satisfying level of detail, entirely appropriate, as it is indispensable to the initial landings. Allied forces cannot come ashore at any hex that has a German strongpoint, and all beach hexes have them, save for the lightly-defended Utah. Secondly, the German has heavier fortifications behind the beaches and these two have to be attacked, if not eliminated entirely, to prevent unacceptable casualty levels in the assault waves. Allied ships are portrayed on an individual level, a design choice that is ultimately a lot better for simulation and enjoyment than the superficially simpler alternative of offering generic bombardment points. As with the ground units' order of battle, that of the Allied navies is extremely detailed, showing individual vessels from the mighty battleships down to destroyers, destroyer escorts, monitors and gunboats. Nor are these confined to the fleets of the United States and Great Britain; Battles in Normandy features warships from France, Canada, the Netherlands, Denmark and Poland. All have extremely high mobility, at least by army standards, and yet cannot go everywhere the player might want. To start with, even in the campaign game, they cannot go to the waters west of the Carentan Peninsula. Secondly, their allowable paths are just that, paths, and not open stretches of ocean. They travel pre-determined lanes, more reminiscent of railguns than ships, at least as how they have been simulated through the history of wargaming. There is one characteristic that players should find intuitive: The ships' proximity to land is inversely proportional to draft. More simply, destroyers and their relatives fire at closest range, with cruisers a little further out, and battleships maintaining the greatest distance of all. The bigger guns do not just reach further but have the greater chance of inflicting a hit on a target, again as one would expect. Generally, destroyers hit the target on a die roll of five or six on a six-sided die, and battleships and monitors hit at two or above, with cruisers being around a four. The vast majority of strongpoints are destroyed with one hit. There are enough that take two to make life complicated for an Allied player though, and these do warrant special attention, as even one step is enough to close off a hex to an amphibious attack. Probably the best approach to targeting is to use destroyers to knock out the beach defenses, which using cruisers and battleships to go after the bigger batteries away from the coast. However, heavier ships can, and in many cases should, be employed against those two-step strongpoints that the destroyers fail to wreck. As with land operations, the Allied player should maintain a reserve of ships for such situations, particularly in the Overlord campaign game, which gives him the widest latitude as well as scope. Likewise, he should feel free to assign and reassign missions as the situation demands; for example, it makes no sense to devote lots of naval resources to Utah when they can be used more productively at Omaha or the Anglo-Canadian beaches. Anti-strongpoint bombardment is the core, essential, and overriding mission of the warships. Some have secondary missions, as destroyers can support combat similar to artillery, and heavy cruisers, monitors and battleships can replicated air interdiction, though in a much smaller area. This does not make any less important though, even after their main duty ends with the conclusion of D-Day. All should be liberally employed against all strongpoints within reach, with the general principle being that it makes no sense for ground forces to risk casualties assaulting something that can be destroyed without risk by naval gunfire. A Marine acquaintance once summed it up as "Never send a man where you can send a bullet, then send the biggest bullet you can find." Those words are very much the truth in Battles in Normandy. The next step is to put the soldiers ashore after the sailors' bullets have done their work. Nearly every beach landing, except perhaps for a lucky few on Utah, carries risk. This is expressed along two indices, both represented by dice. One is the number required on a computer-generated die roll to inflict a step loss, similar to the way that naval bombardment is handled. The other is the number of dice that the software will roll. Most American infantry regiments and British brigades have four steps, and thus will weather the landings without elimination, unless the Allied player has been spectacularly unlucky or inept with his preparatory gunfire. Furthermore, most losses will be made good in the passage of time, representing loss of cohesion and organization as much as blood. Other units have two steps and have the very real danger of being destroyed outright, never to return to the game. These include the Rangers and Commandos, plus tank battalions. Generally though, it is worth the risk to put them ashore on D-Day. The same cannot be said of other units in the Allies' initial order of battle. There is absolutely no call to land a one-step artillery unit on a beach when there is a chance that it will take a loss. It is simply too important to risk. The same goes for the army and corps-level supply units. It is a lot better to go a day or two without a cornucopia of beans, bullets and benzene than it is to put it on the beach early, only to see it destroyed, turning an early bonus into a permanent embarrassment. The Allied player should not ignore the importance of his engineer battalions in the early going. All prospective landing sites are mined, and these cannot be cleared from offshore by the navy. The best, most efficient way is by engineers, up close and personal. With the mines joining the hex's strongpoint on the electronic deadpile, the beach becomes a much better place for reinforcements to land. Thus engineers are prime candidates to land on the first day, if not with the assault waves, then following them onto a secured beach. It is seldom entirely risk free, but is worth the hazard more often than not. CONCLUSIONSGetting ashore is just the start to the Overlord scenario. The rest of the game sees the Allies consolidating their beachheads and pushing inland. Always pushing inland. That part is the most difficult and often frustrating, as venturing into the bocage means incremental progress at the cost of high casualties. At least that is how it feels from the Allied perspective; a player taking the part of the Wehrmacht will find the hedgerows his salvation, at least for a while. The scenarios for Omaha and the British beaches show this vividly and with short playing times. The Allies look like world beaters for the first few days, and then the bocage changes their self-image, actually that of the Allied player, for the worst. These make good introductory scenarios for learning how to fight as either side. The task of invading France is first and foremost, and then the player gets a taste of trying to fight inland. In addition, the scenario for the British and Canadian beaches shows quite effectively why Caen was such a poorly-chosen early objective. Against run of the mill German infantry, getting there is quite difficult, but with the Wehrmacht fielding a couple of panzer divisions in the vicinity, Caen might as well be on the other side of the world when the British still have sea water in their boots. The best scenarios tend to be the bigger ones, and my two favorites are the campaign game and the one for Falaise. Overlord shows the operation in all of its complexity, but in practice it is remarkably playable, a lot more so than one might expect. Falaise is another big one, and lacking the challenge of the D-Day beaches, gives an excellent account of itself for simulating an envelopment along a clearly defined front. There are a lot of reasons to like Battles in Normandy. It uses an excellent system, one already proven in two early games, and enhanced further for this one. Further, the game gives an excellent view of World War II operations, including some neglected elements. For example, most gamers would be hard-pressed to find any game, board or computer, that accomplishes all that Battles in Normandy does when it comes to naval gunfire support of amphibious operations. Most sketch it in much more general terms, or simply assume that the navy will be able to do its job without further examination. The game does have a few spots in which it could have been better. A look at airdrops on a par with amphibious landings would have been a major improvement, and entirely appropriate. In addition, there is at least one place in which an otherwise terrific order of battle shows a striking shortcoming. In the British D-Day landings, the assortment of "funnies," tanks modified for specialized engineering and armored support roles, organized under the 79th Armoured Division. For some reason, perhaps the difficulty of fitting them into the core system, they do not appear in Battles in Normandy, and they are truly missed. One consequence is that, more often than not, the British and Canadians tend to incur ahistorically high losses, often exceeding even those of the Americans on Bloody Omaha, precisely the kind of bloody mess that the "funnies" were intended to prevent. Sometimes too the game engine makes frontal attacks much more difficult than one might expect from history. The combat system in the Decisive Battles of World War II series is most unfriendly to attacks from the front, even at high odds, rewarding those to the flanks and rear to a much greater extent. In my opinion at least, it appears intended more for situations in which lines break and battles degenerate into multiple, semi-independent struggles than for those conducted along a coherent front. In sum, it works better for The Ardennes Offensive than it does for many situations in Battles in Normandy. Finally, this game could use some additional scenarios, especially those concerning the British offensives of Bluecoat, Epsom and above all Goodwood. As with its series predecessors, Battles in Normandy comes with a scenario editor, so this is not necessarily an insurmountable obstacle, or maybe even an enduring one. With most World War II operational games, planning an attack can be as simple as massing firepower, achieving high odds, and blowing the enemy to hell. It is a American principle that would appeal to Americans and Russians of that time, relying on satisfying masses of those big bullets to tear a hole that one can exploit. Battles in Normandy calls for more finesse than that. Firepower kills, but a planning and skill win. It is, without a doubt, a very interesting game. Not everything is obvious or expected, and players are called upon to do things unusual in a game of this genre, such as conducting reconnaissance or executing naval gunfire. Besides fostering interest in itself, Battles in Normandy stands a good chance of renewing the urge to play its predecessors again, and to venture into the next installment, Battles in Italy. In my case at least, this is precisely what happened.
|